Browsing Category

Photo Tips & Tricks

Photo Tips & Tricks

New Year New Gear

Over the past few days I’ve been overwhelmed with the number of posts I see from people sharing their “word of the year” and their lists of resolutions and goals. These are really inspiring. But you know what? I don’t have a word of the year. I don’t have a list of specific goals I want to achieve this year and I don’t have a list of resolutions. Good lord, it’s only the first week of January and I already feel like I’m behind. I still struggle to get my child and I both showered and dressed and put healthy meals on the table so my project plan for 2013 has pretty much ended up on the back burner. I think having a plan and some goals for the year is a great idea, but at this point my goal is just to get some goals. There, I’ve said it. My New Year’s resolution is to get some resolutions. And maybe when I do, I’ll share them as apparently you’re more likely to stick to things you announce to the world.

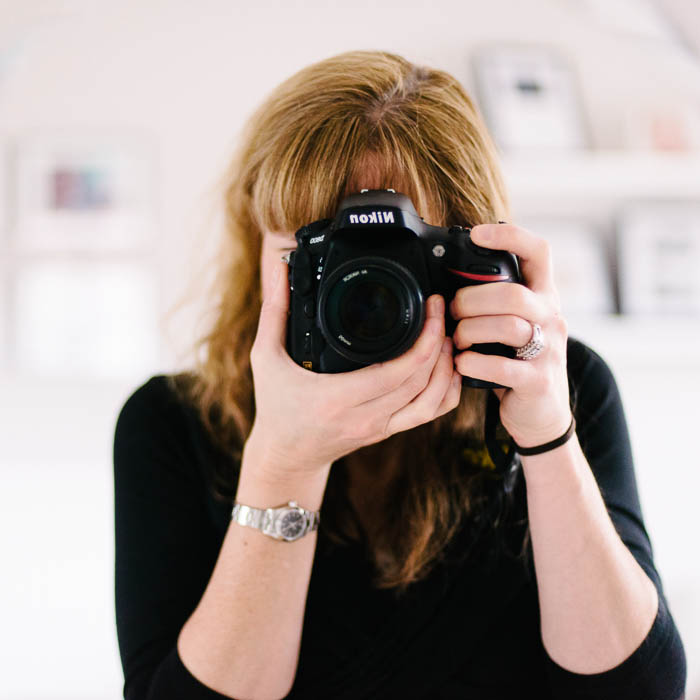
But my lack of planning doesn’t mean that all is lost for 2013. Because what I do have to kick off the new year is a new toy. Santa was super nice to me this year and brought me a new camera, a Nikon D800. My D80 has been a workhorse for a several years but it was definitely time for an upgrade. So I have at least one project on the books for 2013, figuring out how to use the D800. Yes, it’s still a Nikon but there are enough changes that I’ll need a little practice to find that sweet spot where the two of us work together in harmony.

201212_nikon_014

What I’ve Learned About the D800 So Far

01. The autofocus system on the D800 is super advanced and is a huge leap in technology from the D80. On the D80 I had a system, I knew what worked for me in different situations. Now I have many more focusing options (a good thing) and I’m experimenting with the different focus modes quite a bit as I try to find my groove. As I’m regularly shooting a kid on the move, I definitely want to figure out how to make effective use of its 3D Tracking and AF-Area Auto which leverage things like facial recognition and tracking moving subjects.

02. On the D80, I always shot in RAW. For portraiture in particular, I wanted the flexibility in post-processing to get the look and feel that I wanted. And something about shooting in JPEG and knowing that you’ve lost information in the process that can never be recovered, it just felt better to capture all the data in an image. But wowza, I was not prepared for the massive jump in file size for RAW on the D800. Between the jump in mega pixels and the change from crop frame to full frame, holy moly those files are huge. So now I’m experimenting with JPEG and Nikon’s Picture Control system for making in camera adjustments to things like contrast and color saturation. I suspect that for portraits I’ll still want to shoot RAW but may shoot JPEG for other things like landscape or food. I do know that I’ll spend part of my new year figuring out a new workflow to deal with these massive files and keep them organized, backed up, and not hogging up all the space on my hard drive. And, using some Amazon gift vouchers that Santa also sent to buy some bigger memory cards.

03. I am now at that stage in life where I fully appreciate and use the diopter adjustment on my camera. I’m in complete denial of the fact that I need bifocals, or the now less geriatric sounding “vari-focal lenses.” And, nothing makes photography more challenging like when you can’t actually see. When I go on shoots I tend to wear contacts but they’re a pain everyday so changing the diopter so that I can see and focus properly is a huge benefit. The D80 has this as well but I found it difficult to adjust so didn’t use it that often. The diopter adjustment on the D800 is easy and now well used. I know this is a silly little thing that I should have made use of before but better late than never.

04. One of the greatest resources I’ve found in trying to learn the ropes of the D800 has been Ken Rockwell. He’s been my go to resource for Nikon advice and tips for a long time and he’s got a super detailed review and explanation of everything on the D800. I’ve also invested in his D800 app for the iPhone and iPad so that I have a manual at my fingertips without having to lug around the book that came with the camera.

05. Unlike the my D80, the D800 has video capability and I’m excited to experiment with this as I have resolved to shoot more video, and do something with it. I’ve shot some video on my iPhone but today these little videos mostly just take up space on my hard drive. My philosophy has just been to capture it and then figure out what to do with it later. Well, it’s later and I need to start doing something with these. I’ve been inspired by Xanthe Berkeley and the Time Capsules she creates. She’s found a beautiful way to combine still images and video into compelling stories.

201212_oxford_007-3

After just a week of using the D800 I am loving it. Yes, I’ve got a bit of a learning curve and the files are HUGE, but the images are so much sharper than on the D80 and I really love how it performs better in low light.

This Year’s Photo Project

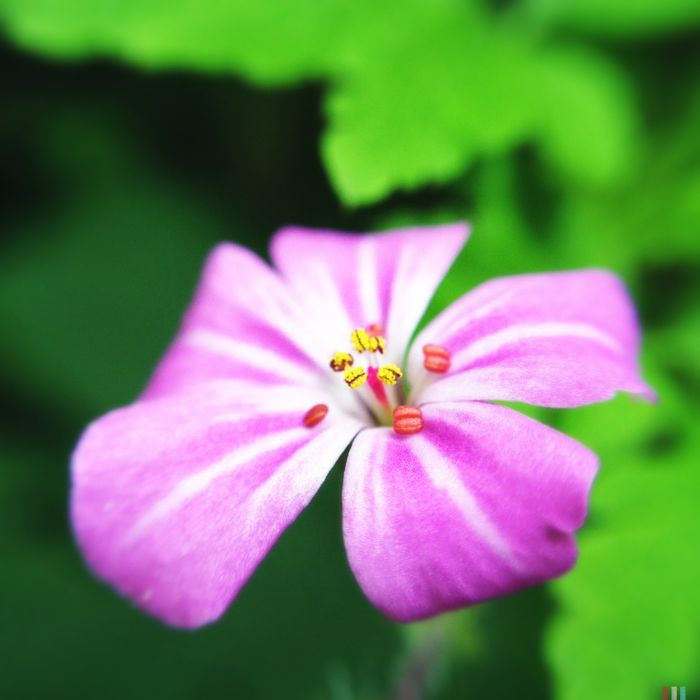
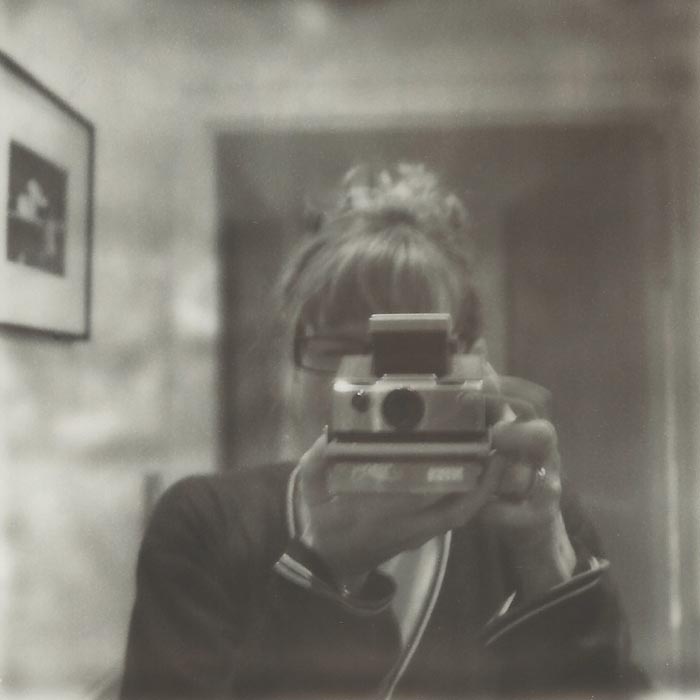
I’m sure there are any number of photography projects that I’ll challenge myself with throughout the year but the one I’ve already committed to is a 52 week self-portrait project. I chose to do self-portraits because not only will it help my technique but it will also get me “in the frame.” Because I take pictures of other people all the time, I’m rarely in a shot. There’s very little photographic evidence that I exist, that I’ve been part of this so-called life. It’s always everyone else. So I thought this would be a great way to grow not just as a photographer but as a person. So if nothing else, you’ll see 52 weeks of me here on the blog.

Did Santa bring you any new gear for the holidays? And, if you’ve got a D800, I’d love to hear your top tips on using it!

Pink Bloom
iPhoneography, Photo Tips & Tricks

Do Apps Make iPhone Photos Less Legitimate?

There is a lot of debate in photography circles about whether the iPhone (or any mobile phone) is a “legitimate” camera.  I say emphatically, YES.  Just look at the work of award-winning photojournalists Ben Lowy and Damon Winter who both captured emotional images of war.  Or wedding photographer Jerry Ghionis.  Who wouldn’t want wedding photos like that?  Ghionis is spot on when he says:

“Photography is more about the craft of lighting, posing, composition and story telling, etc. than which camera you use.”

Super fancy camera gear may make a difference in certain situations, say high-speed sports action.  But at the end of the day, it’s still the person behind the camera making artistic decisions about how to shoot and the aesthetics they use to convey a message.  The iPhone is just another tool in the photographer’s arsenal, whether they’re an amateur or a professional photojournalist.  And iPhones are typically the cameras we always have with us and ones that make it easy to capture life’s moments without getting in the way.

Much of the debate around mobile photography is around apps and filters applied to photos.  About whether these apps take away from the legitimacy of an image.  But I think this is no different from adjustments people make in Photoshop.  Model in a glossy magazine?  Someone took her photo with a really expensive camera, but she’s not real, even though we’re expected to believe she is.  Just like Photoshop, iPhone apps can be used to enhance an image, maybe improve it, maybe give it a certain mood.  For example, by changing an image to black and white.

But what many iPhoneographers are also doing is using apps to create an image, turning a photo into something completely different like abstract art.  And while this may not be the right approach for photojournalism, I think this is just as valid an art form as oil on canvas.  Spend a few minutes on iPhoneArt to see what I mean.

For me, I feel like my iPhone photography has come full circle.  I went mad with apps in the early days feeling like I had this new cool toy and I had to check out all the fun things I could do with it.  But I’ve recently gone back to basics and am processing my images a lot less, trying to take a more minimalist approach to apps and letting the images speak for themselves.  As a bonus, this is also saving me loads of time.

These days I’m shooting mostly with Hipstamatic making conscious choices about the style I want before I shoot and leaving the image as is.  If you’ve tried Hipstamatic and been scared away by the lens and film choices (like I was originally) try following @hipstaroll or @hipstachallenge to get some ideas of combinations to try.

Things to Consider When Processing an iPhone Photo

  1. Photos of your friends and family, people in general, don’t need to be over processed and have filters and textures put all over their faces.  Make them black and white, enhance the color or contrast, but in general, just let their natural beauty, their realness shine through.
  2. Find a consistent style.  When you first start using an iPhone camera there is a tendency to go crazy trying out different apps, experimenting with ways to make your photos arty.  I know I was super guilty of this. But now I look back through my catalog of iPhone photos and they are all over the place with a multitude of styles.  Experimenting is a good thing.  I recommend it.  But, eventually, find what you really like and what speaks to you as an artist.  Maybe you even have different styles depending on subject matter, landscape, people, architecture, or abstract painterly art.  Try thinking about how your photos would look if you had to put them together in an art exhibition or a book.  Would they look like they came from the same photographer?
  3. Think about why you’re using a specific app.  Is it to enhance your photo or create a specific artistic vision? Or is it for the novelty of the app?
  4. All the rules of good photography still apply.  Composition, light, subject matter, emotion, etc.  Just because you can easily app a photo to death, doesn’t mean you should.  It’s no different from if you were shooting with a DSLR.  Get it right “in camera” first and make sure what you’re starting with is a good photo.  A badly composed photo is still a badly composed photo no matter what filter you apply to it.
  5. How will your images stand up over time?  Will you look back 15 years from now and think “that was a weird phase I was going through wasn’t it?”

What do you think?  Are iPhones legitimate cameras?  Or have apps become a crutch to compensate for average photos?

 iPhone Processing:  Shot with Hipstamatic (Loftus lens, Blanko Freedom film), Olloclip macro lens
The SX-70 and Me
Photo Tips & Tricks, Polaroid

Two Things I’ve Learned About Polaroid

As I’ve taken more pictures with the Polaroid over the past week, I’ve learned two things.

One, there is a lot that can go wrong when shooting with this medium.  The sheer number of variables that are at play in determining whether your picture comes out, well there are a lot.  You might change just one variable, say exposure, to take the exact same shot.  But there’s no guarantee that all the other variables have remained constant.  So you don’t really know if the one thing you changed improved the photo or not.

Variables like:

  • Exposure.  Why is turning a little dial from light to dark in order to adjust exposure infinitely more difficult than adjusting shutter speed, aperture, and ISO?  Maybe because there’s more of an art to it.
  • Temperature.  I’ve learned that cooler weather like we have here isn’t ideal for a developing Polaroid.  So, I’ve taken to stuffing them in my bra strap to keep them warmer and I have to say I think it’s helped.
  • Shielding.  The first couple of seconds outside of the camera are critical for the development and if you haven’t shielded the image from light immediately it gets WAY overexposed.  I’m getting better at this with practice.
  • Low light.  So far I’ve had many more low light situations than bright.  The one day I did get to shoot in full sun yielded much crisper images.
  • Moving subject.  This thing is so slow, you can even see my finger moving just after pressing the shutter button above.  Certainly, you can shoot motion blur intentionally, but when you’re not it just comes out blurry.
  • Dirty rollers.
  • Faulty camera.
  • Bad film.

You can see why people have abandoned this for digital.  Point, click, consistent.

Imperfect Flowers

Which leads me to the second thing I’ve learned.  Shooting Polaroid means learning to appreciate imperfection. It means if you’ve been trained to strive for crisp, clear, sharp images, you need to let that go and just enjoy the interestingness that comes out of the camera.

No two photos will ever be the same, they are each unique creations.

iPhoneography, Photo Tips & Tricks

Using Your iPhone to Capture Great Macro Shots

Macro photography produces some amazingly gorgeous images and it’s always been one of my favorite styles of photography.  The way these close up photographs capture the intricate details of the world around us, the details that are easily overlooked, is astounding.  But to create really stunning macro images you do need the right camera gear, something I haven’t decided to invest in yet.  It really just hasn’t been super high on my priority list at this time in my life.

But, enter my trusty iPhone.  Using some birthday gift vouchers (Thanks!), I treated myself to an Olloclip. What’s a Olloclip you ask?  Well, it’s this ingenious little gadget with fish-eye, wide-angle, and macro lenses that you clip onto your iPhone.  Yes, I’m taking my iPhone photography to the next level and attaching an external lens to my phone.  I know that sounds crazy.

So far though, I’m loving this thing.  My one and only gripe is having to take the case off my phone to attach it but that’s really not a big deal.  I captured all the images above with the Olloclip macro lens attached and they are all straight out of camera and unedited.  I shot some of them with the native Camera app and some with Hipstamatic (Loftus lens, Blanko Freedom 13 film).

Things I’ve learned about shooting with this macro lens so far:

  1. You need good light.
  2. Your ideal subject is stationary.
  3. You need a steady hand or a tripod.
  4. You need to get really, really, really close to your subject.

So, an iPhone with the Olloclip won’t be the best camera gear for getting macro shots of dangerous living animals.  But, for plenty of other subjects it’s a great choice for experimenting with macro photography on your iPhone.  I haven’t yet tried the fish-eye or wide-angle lenses.  If you’re into iPhone photography and have a iPhone 4 or 4s, this is definitely an accessory to consider.

And, as a bonus, it will give you an excuse to treat yourself to some flowers.

Roy G
iPhoneography, Photo Tips & Tricks

Putting Your iPhone Photos Together to Tell a Story

The big news on the social networking scene this past week was Facebook’s $1 billion purchase of Instagram, a mobile photo sharing app used by 40 million people, me included.  Lots of people are up in arms over this and think Facebook is going to kill Instagram.  There will certainly be changes over time, some for the bad but maybe some for the good.  Facebook isn’t the devil people, it’s just a social network, not life or death.

But this isn’t a post about the future of Instagram, plenty of other people have covered that extensively.  This is about continuing to take lots of iPhone photos and using Instagram as a platform to collect and share them.

Sharing individual photos with Instagram has become a major part of how I tell the stories of my everyday life. But sometimes, pulling together multiple photos into a collage is an even more powerful way of telling a story. You can group a collection of photos with a similar theme or share the who, what, why, and where of a special event as a single “storyboard.”  Check out Susannah Conway’s beautiful site for an excellent example of this. She hasn’t said a word but just by looking at this series of images as a whole, you feel like you know what she’s been up to.

There are a number of tools that I’ve used to create collages with my iPhone photos.  And, most of these work just as well with non-iPhone photos.

From the iPhone or iPad

Diptic and PicFrame are both great apps for creating photo collages directly on your iPhone or iPad.  They have very similar templates, work basically the same way, and cost the same.  So for me, this is pretty much a toss-up.  You can’t go wrong with either.  Both allow you to export high-resolution photos which can then be shared out through Instagram.  I created the image above using PicFrame.

From Flickr

With Instagram, you can easily share your photos to Flickr.  Once the photos are in Flickr, you can use a program like Mosaic Maker from Big Huge Labs to create a basic grid collage out of individual photos, photosets, or tags.  I used this last year to create monthly summary collages of my 365 project.  I don’t really use this much anymore though because all my photos aren’t in Flickr.

From Your Mac

First, if you’re taking lots of photos on your iPhone you’re using iCloud to back them all up, right?  Good.  This means they’ll already be on your Mac in iPhoto ready to export or do whatever you want with them.

I use Adobe Lightroom to organize and manage all my photos.  It’s also where I do 90% of my editing.  One of the things you can do with Lightroom is leverage the Print module to create collages because you can “print” to JPEG.  This excellent tutorial by Jay Watson shows you how to create a diptych with the Lightroom Print module.  You can easily extrapolate this to create whatever type of collage you want.  And, you can save any templates you create for future use.  For example, I used Jay’s method to create the collage I used in this post.

Photoshop though is the clear winner for me if you want to get really creative with photo collages.  It might be a little more work but the results are worth it as you have complete control over the design.  To make life A LOT easier, I highly recommend checking out the photo layouts by Pugly Pixel.  She offers some photo layouts as freebies and others for a very nominal fee.  And her web site is loaded with tutorials on how to use them with Photoshop.  Everything I know about designing with Photoshop, I’ve learned from her.  The collage of Instagram photos that I used in this post was created using a Pugly Pixel Photoshop template.

Finally, if you don’t have Photoshop or Lightroom but have a Mac OS X 10.7 or later, you can get the wonderful PicFrame (same app as for the iPhone) from the App Store dirt cheap.

Creating collages not only helps to tell a story, but, as a bonus, it also saves you LOADS of time when you’re trying to include lots of photos in a blog post.  Inserting a set of images as a single photo in a blog post is so much less painful than trying to insert and align numerous images.  Much less painful.

Thanks to Nanette who asked a question that inspired me to write this.